Welcome to our informative post – “Understanding & Eliminating Unpleasant Odors from Your A/C Unit”. We all desire fresh, cool air especially during the scorching summer months. But if your A/C unit emits unpleasant odors, it could be a total game-changer. In this guide, we explain the causes behind this issue and offer expert advice on addressing it to ensure your comfort is not compromised. Equipped with factual information, this post is intended to educate you about unanticipated or unnoticed issues with your A/C unit and empower you with practical knowledge for maintaining a fresh, odor-free environment in your home or office. Read on to discover how keeping bad smells away from your A/C unit can be easy, hassle-free, and even money-saving in the long run. This guide could be your first step in turning a frustrating problem into a manageable solution.
Understanding the Causes of Unpleasant Odors in Your A/C Unit
Experiencing unpleasant odors from your A/C unit can be discomforting, and understanding why it’s happening is the first step to finding a solution. There are several reasons that could contribute to such discomfort.
Perhaps the most common cause is a buildup of dirt, dust, and grime inside the unit. As the A/C circulates air, it also captures particles that are present in the atmosphere. Over time, the accumulation of these substances can create a damp, musty, or foul smell that gets distributed around the room. Regular cleaning and maintenance can prevent this. Additionally, a sign of a mold or mildew infestation could be another cause of a bad smell, typically described as a ’dirty sock’ or damp, musty odor. Molds and mildews thrive in damp and dark environments, such as your air conditioning unit.
Blocked drainage can also contribute to the unpleasant odor. A blocked drain can make stagnant water collect inside the unit, earning it a stale or pungent smell. Ensure drainage is clear to avoid this problem.
Few people realize that dead animals may also cause this problem. Small creatures like rodents or birds can sometimes get trapped inside or even near the A/C system, and as their remains decompose, your A/C can circulate the unpleasant smell. While upsetting, a thorough cleaning and pest control measures should resolve this.
Likewise, it’s noteworthy to mention the importance of regular maintenance and quality parts. Always buy your parts from reputable sources and ensure your A/C system is regularly checked for blockages, inefficiencies and potential infestation points. With routine cleaning, part replacement and timely repair, your A/C unit should provide not only comfortable temperatures but also fresh and pleasant air.
Remember, if your A/C unit is giving off unpleasant odors, it’s indicating a problem that needs immediate attention. Ignoring it will not only make your air uncomfortable but may also cause respiratory problems over time. So don’t overlook it – instead, identify the problem and take immediate necessary action.
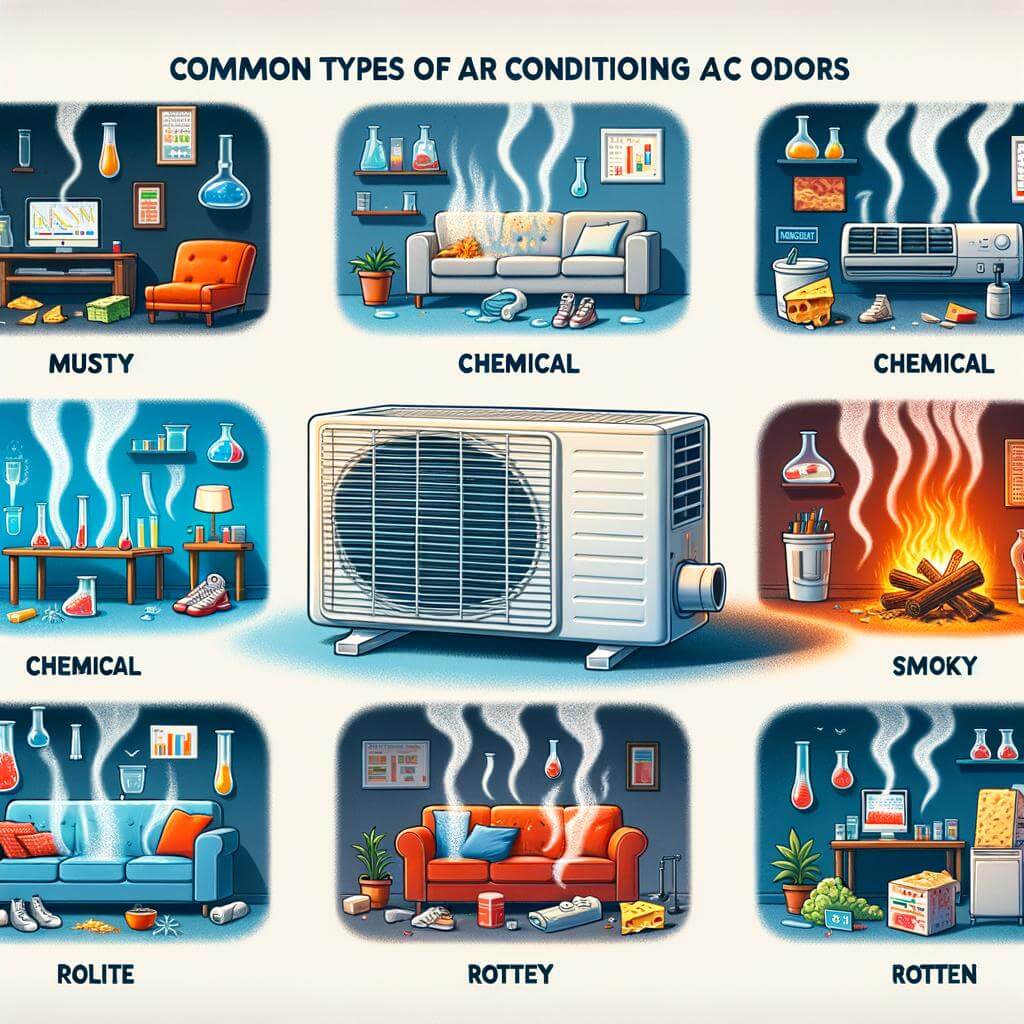
Investigating Common Types of A/C Odors: What’s That Smell?
There’s a myriad of reasons why your A/C unit could be producing unpleasant odors. The most usual culprits of musty or burning smells include mold growth due to excess moisture, dirt accumulation on the filter, damaged insulating foam, or a burning motor. The moment you start noticing an unusual smell starting to emanate from your unit, it is essential to take action immediately. Not only can these smells be annoying or unpleasant, but they can also indicate serious issues with your A/C unit.
No matter what the underlying issue might be, it is essential to promptly deliver a solution to prevent potential damage to the HVAC system. Identifying the problem is the first step to finding a solution, here we enlist some common odors and their potential causes:
An electrical smell might indicate that your unit’s motor is burning out.
A moldy smell often represents a sign of mold or mildew accumulation within your unit due to excess moisture.
A rotten egg like odor might suggest a dead animal in your ducts.
One method to alleviate the smell arising from your A/C unit includes having the air filter replaced every 90 days. Ensuring that your central air conditioning unit is routinely maintained is another relevant way to avoid unpleasant odors and longer running times. Moreover, make sure to check the unit’s drain pan for any stagnant water or clogs in the condensate line, both might contribute to the accumulation of bacteria and mold, resulting in a foul odor.
Possible Odors & Their Causes
Odor
Possible Cause
Electrical
Burning motor
Moldy
Excess moisture and mold accumulation
Rotten Egg
Dead creature in ducts
Remember, maintaining a clean and functional A/C unit is not just about comfort, but also about health. You don’t want to be spreading bacteria, mold spores, or bad smells throughout your home.
The Role of Proper A/C Maintenance in Odor Prevention
If you constantly find yourself turning up your nose at the less than pleasant aroma wafting around your home whenever the air conditioning runs, you may need to pay attention to your A/C maintenance regime. Ineffective or insufficient maintenance can allow mold, mildew, and other unwelcome guests to grow in your A/C unit and foul up your indoor air quality. Regular care and attention can help prevent musty odors, keep your A/C system running at peak efficiency, and improve the overall air quality in your home.
Depending on the cause of the odors in your A/C unit, various solutions may be appropriate. Regular cleaning and upkeep can remove many common sources of foul smells and prevent them from recurring. This includes:
Cleaning coils to remove bacterial growth
Replacing filters to eliminate collected dust and other particles
Regularly checking and cleaning the drain pan
Inspecting for and sealing any duct leaks
Sometimes foul smells can also indicate deeper problems that need professional attention. For example, a burnt plastic smell can suggest electrical issues that pose a potential fire hazard, while a sewer-like smell might signal a backed-up condensate drain.
Odor
Possible Cause
Suggested Solution
Burnt plastic smell
Electrical issues
Consult a professional
Sewer-like smell
Backed-up condensate drain
Clean or replace the drain
Proper care and attention can prevent many A/C odors before they become a problem. Don’t let a smelly A/C unit lower your indoor air quality and make your home an unpleasant place to be. Be proactive with your A/C maintenance, and enjoy the benefits of fresh, clean air all year round.
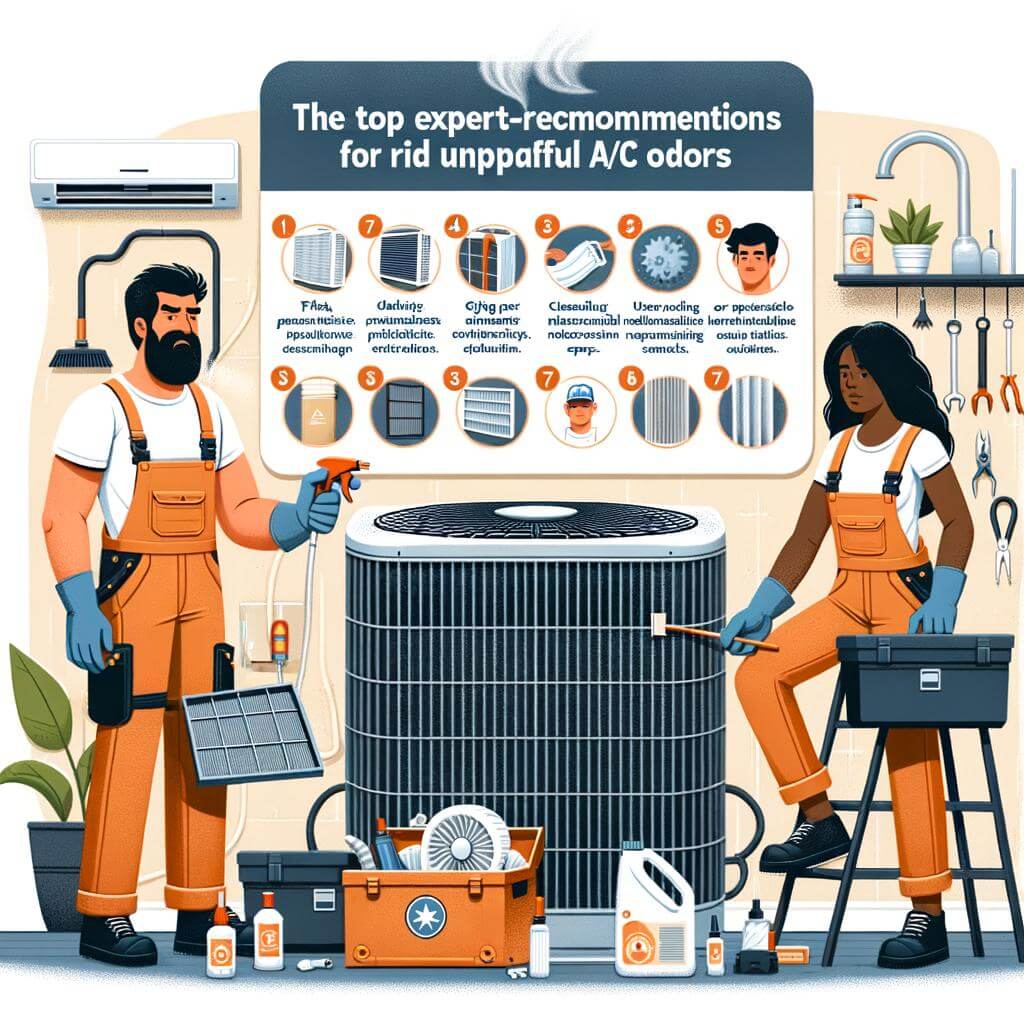
Top Expert-Recommended Solutions for Eliminating A/C Odors
Getting rid of the unpleasant smell from your AC unit can prove to be a daunting task without the right guidance. Luckily, we have compiled some expert-recommended solutions to help you solve this problem in a jiffy. These solutions have proven highly effective in eliminating even the most stubborn AC odors, leaving your home smelling fresh and clean.
Cleaning Your AC filters: Over time, AC filters can gather dirt and debris, leading to an unpleasant odor. You can solve this by either cleaning or replacing them. A good rule of thumb is to check your filter every month and replace it quarterly. A thorough cleaning with a cleaning solution and warm water should also do the trick.
Regular AC Servicing: Periodic servicing by a certified technician keeps your AC unit in top shape and prevents the buildup of mold and mildew, which are the primary cause of the smell.
Using A/C odor eliminators: Odor eliminators come in different forms, such as sprays, tablets, and foams, these can be sprayed or placed in the AC system to eliminate odors caused by bacteria and mold.
Another important thing to remember is to prevent the causes of these odors from the start. Keeping your AC unit in a dry and ventilated location minimizes the chances of mold and bacteria buildup. Regular servicing, proper installation, and using quality filters will go a long way in maintaining an odor-free AC.
Activity
Frequency
Change AC Filter
Every 3 months
AC Unit Servicing
Once a year
Using Odor Eliminators
As needed
Creating a Fresh and Clean Home Environment: Further Tips and Tricks
Unpleasant odors from your A/C can be off-putting and could ruin the ambiance of your home. And while it’s easy to dismiss these odors as mere inconveniences, they could be potential indicators of a more serious problem within your A/C unit. It’s important to understand the possible causes of these odors, which in most cases, are traceable to underlying issues such as water leaks, dirty filters, or even molds.
Water leaks:Excess moisture can encourage the growth of bacteria and mold, which can cause a musty odor. Always check for standing water around your A/C unit, and if you find any, seek professional help immediately.
Dirty Filters: With time, your A/C filters can accumulate various pollutants and particles which can cause unpleasant smells. Regularly changing or cleaning the filters can help alleviate this issue.
Molds: They’re not just detrimental to your A/C system but also to your health. They often give a stale or musty smell, and their presence can best be determined by a professional.
Finding a solution to this problem often involves a detailed approach of checking various components of the A/C system. However, some DIY methods can help eliminate these odors. You can start with a thorough cleaning of your A/C unit, ensuring that all the filters are cleaned or replaced. Using a mixture of white vinegar and water can help eliminate mildew or mould smell. Incorporate essential oils like lavender or eucalyptus in the cleaning process to give a fresh scent.
Cleaning Agent
Benefit
Vinegar and Water Mixture
Eliminates Mold and Mildew
Lavender Essential Oil
Provides a Refreshing Scent
Eucalyptus Essential Oil
Offers a Clean, Fresh Aroma
If the above remedies don’t minimize the odors, it’s probably time to call in the professionals. It might be a more serious problem that needs an expert’s attention. Take note that ignoring these smells could lead to higher repair costs in the future. Maintaining a clean and odor-free A/C system is key to a fresh and comfortable home environment.
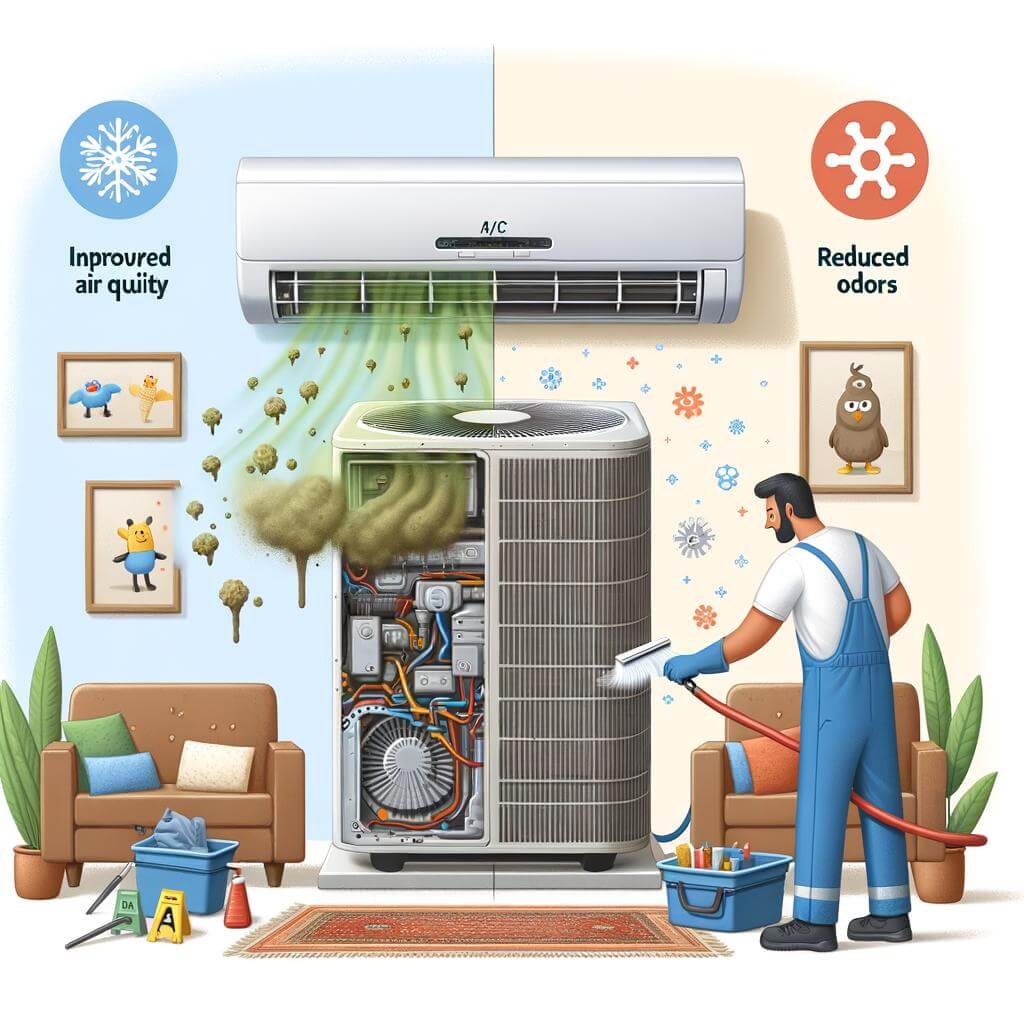
How Regularly Servicing Your A/C Unit Can Improve Air Quality and Reduce Odors
Maintaining Pure Air Quality Regular professional servicing of your air conditioning unit is a key factor in maintaining the indoor air quality of your home or office. Over time, your A/C unit collects a substantial amount of dust, allergens and other contaminants that can breed foul-smelling bacteria and mold when not cleaned properly. These contaminants can significantly affect the air quality, leading to unpleasant odors and a range of health problems such as allergies, asthma, or other respiratory issues.
Apart from your health, servicing your air unit can help with the following:
Increasing Efficiency: Regular servicing enhances the efficiency of your unit, making it work less to cool your space. This reduces energy consumption and lowers your energy bills.
Preventing Costly Breakdowns: An annual maintenance checkup can detect potential problems early before they escalate into larger issues that may cause your unit to breakdown.
Eliminating Unpleasant Odors Apart from negatively affecting your health, foul-smelling bacteria and mold in your A/C unit can also create unpleasant odors throughout your space. Regular servicing can help to eliminate these odors by removing the contaminants that cause them. This is typically achieved through a thorough cleaning of your unit’s evaporator coils, blower motor and other key components.
A/C professionals may also use special treatments to get rid of mildew and mold. A fresh and clean smelling air conditioning unit greatly improves your overall indoor air quality. This not only makes your space more comfortable to be in but also maintains a healthier environment for everyone.
To book professional A/C unit servicing, you may want to consider the following:
In conclusion, understanding the causes and solutions of unpleasant A/C odors are crucially significant for a comfortable living environment and optimum performance of your air conditioning unit. Unpleasant smells from your A/C can be an indication of a minor issue or a chronic problem that needs immediate attention. We hope this guide helps you diagnose, eliminate, and even prevent these odors from infiltrating your indoor air quality. Remember, regular maintenance and cleaning of your A/C unit can go a long way in eliminating potential odor-causing problems, and when in doubt, always turn to a professional. After all, your comfort and health are of the utmost importance.
Welcome to this insightful post where we explore the causes of low water pressure in your shower. If your mornings are plagued by feeble trickles rather than invigorating sprays, you know the frustration of low water pressure in the shower. Understanding the causes can be the first step to finding solutions and improving your daily routine. This comprehensive guide provides technical insight, expert opinion and fact-based information to equip homeowners with everything they need to know about this common issue. On reading this post, you’ll be better informed about potential causes and will be armed with useful knowledge on how to diagnose and address this problem effectively. Embark on this journey with us and enlighten yourself on how to improve your showering experience.
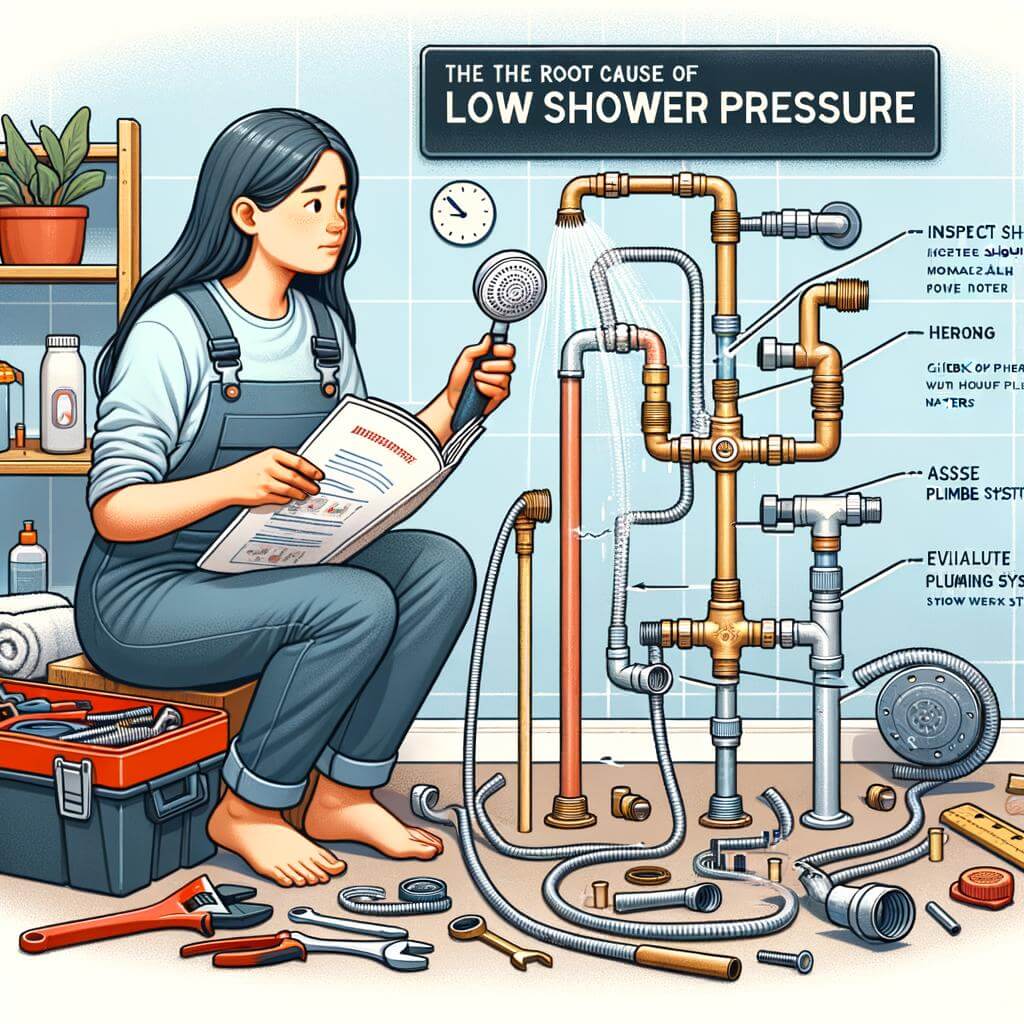
Understanding the Mechanics of Your Shower Plumbing
If you’ve ever stepped into your shower on a chilly morning, hoping for a hot, invigorating experience, only to be greeted by a measly dribble of tepid water, then you understand the frustration of low water pressure. Before diving into the possible causes of this issue, it’s important to comprehend the basic mechanics of your shower plumbing.
Your shower system primarily consists of a series of pipes that supply both hot and cold water. The cold water pipe is directly linked to your main water supply, while the hot water pipe is connected to your water heater. These pipes meet at the shower valve, where you regulate the temperature by adjusting the ratio of hot to cold water. From the valve, the water is directed upwards into your shower head.
Once you understand the basic plumbing setup, you can identify possible reasons for low water pressure in your shower. There could be several causes for low water pressure, although they generally fall into two main categories: issues with your shower control valve or problems with your hot and cold water pipes.
Shower Control Valve: If the problem is really located in your shower control valve, the valve might be clogged with mineral deposits or it could be broken. In either case, the valve won’t allow enough water flow to the showerhead.
Apart from these primary causes, low water pressure could also occur if there are multiple plumbing appliances being used concurrently in your house.
A professional plumber will be able to diagnose the exact cause of a low water pressure issue in your shower, and could suggest practical solutions such as replacing old pipes, installing a water pressure booster, or simply cleaning out your shower valve.
Common Reasons for Low Water Pressure in Showers
Whether you’re looking to enjoy a relaxing hot shower or trying to wash away your worries, dealing with low water pressure can dampen the experience. For most homeowners, this is a common yet frustrating problem. There are several reasons for this issue that may be at the root of your shower troubles.
Old Plumbing
Old plumbing systems often suffer from internal corrosion, leading to blockages that reduce the water pressure. The pipes may have mineral deposits and other buildups that impede the water flow. Particularly if your home is over 20 years old, this could be causing your issue.
Faulty Fixtures
Another cause might be your shower head or faucet. Over time, they can accumulate mineral deposits that decrease the water pressure. Alternatively, these fixtures could simply be faulty or old, requiring replacement. You can try cleaning them or, if that fails, consider getting new ones.
Water-Saving Devices
Your water pressure might also be reduced if you’ve installed water-saving devices. Though these are designed to conserve water, they might be limiting your water flow too much, especially if they’re incorrect for your specific system. Check to see if removing these devices improves your pressure.
In the table below, you will find a summary of these common reasons.
Problem
Possible Solution
Old Plumbing
Consult with a plumber
Faulty Fixtures
Clean or replace shower head/faucet
Water-Saving Devices
Check compatibility or remove
Keep in mind that these scenarios are just some of the most common culprits. There may be other reasons why your shower isn’t providing the pressure you’re used to. It may be worth calling a plumbing professional if the problem continues. Their expertise can help diagnose and resolve the issue, ensuring you get to enjoy your desired water pressure once more.
The Environmental Impact of Low Water Pressure
Though it might not be the first thing that comes to mind, low water pressure can indeed have environmental implications. When your shower runs less efficiently due to decreased pressure, it often results in longer showers to get clean – and that inevitably leads to excessive water usage. According to the Environmental Protection Agency (EPA), a shower with optimal pressure should be using approximately 17.2 gallons of water for an average 8-minute shower. So, there’s a considerable amount of water that gets wasted with longer showers brought about by low water pressure.
Further, low water pressure can also indicate more serious infrastructural problems, such as leakages. These can both waste an enormous amount of water and damage the surrounding environment over time. Fixing the issue not only helps conserve water but also reduces the energy used in water heating, thus minimizing your carbon footprint. Here’s a small breakdown of potential water and energy savings from fixing low water pressure:
Potential Savings
Expected changes
Water Consumption
20-30% reduction
Energy Usage
Lower energy costs due to less water heating
To sum up, while the inconvenience of a dribbling showerhead may seem like a minor issue, mitigating it can have compounding benefits – for your pocket and the planet. So it’s worth investigating the cause and solution if you are dealing with low water pressure.
How to Diagnose the Root Cause of Low Shower Pressure
Potential ProblemObservable SymptomsSolutionDepositsDirt and grime that block the showerhead, impeding water flow.Clean showerhead with a brush or soak in a descaling solution.Water Main IssuesConstant low water pressure in all areas of the house.Contact a professional plumber, could be a municipal issue.Shower ValveFluctuating temperatures and irregular water pressure when using shower.Inspect for any malfunctions or blockages and replace if necessary.Leaky PipeTraces of water stains or leak spots on walls or floors. Unexplained increase in water bills.Contact a professional plumber to locate and repair the leak.
Specific Solutions to Counter Low Water Pressure
Your daily morning showers not as satisfying because of the low water pressure issue? Here’s how you can tackle this problem head-on. First, check if the low flow shower head is the root cause. Often, a clogged screen or aerator disrupts the water pressure. Regular cleaning or replacing can do the trick. Another common culprit is the water pressure regulator. If it’s set at a low level, adjusting it back to a suitable level will fix the issue.
On the other hand, the problem might be a bit more serious, such as a leak in the water pipe. If that’s the case, you’d need to have it repaired or replaced as soon as possible. Similarly, if your area has hard water, the accumulation of minerals might be blocking your pipes, thus leading to low water pressure. A water softening system will be able to resolve this issue. With the mentioned solutions, you would hopefully be able to reclaim your refreshing shower times and forget about the low water pressure.
Expert Advice on Maintaining Optimum Water Pressure in Your Shower
Dealing with a slow trickling shower can be frustrating. It’s usually caused by a few common issues. One of the primary causes is clogged pipes. Over time, your pipes can become blocked by sediment and other debris, resulting in a decrease in water pressure. Other causes include worn out pipes or a faulty pressure regulator. While these may seem like daunting issues to face, there are few simple solutions you can try.
One of the most effective ways to increase water pressure is to clean your showerhead. Sediments tend to accumulate in the showerhead, which can result in reduced water flow. This can be easily done by detaching the showerhead and soaking it in a vinegar solution overnight. Another method is to check your water pressure regulator. If it’s set too low, your shower won’t have enough pressure. To resolve this, you might need to adjust or replace the regulator. Lastly, if your pipes are old, consider upgrading your plumbing system to improve water pressure.
Solution
Benefit
Cleaning shower head
Removes deposits, improving water flow
Checking water pressure regulator
Allows adjustment to improve pressure
Updating plumbing system
Boosts overall water pressure in the home
Remember, it’s always important to resolve water pressure issues immediately. If left unattended, they can result in higher water bills, and long term damage to your plumbing system. Don’t hesitate to seek professional help if the problem persists. A qualified plumber can diagnose and fix the issue quickly and correctly, saving you time, effort and potential future costs.
When to Seek Professional Help for Low Water Pressure Issues
Low water pressure can significantly affect your home’s comfort level. Identifying when to seek professional help is crucial in preventing more significant problems that may be causing the reduced pressure. Not all low pressure issues require expert interference, but there are some scenarios where professional help becomes essential.
When you’ve tried basic troubleshooting without success, such as checking your main shut-off valve or your shower-head for any visible issues, it might be time to call a professional. If the low pressure is consistent throughout your home, affecting all faucets and showers, it’s a clear indicator of a larger issue that should be addressed by a professional. Finally, if you’ve recently done any home renovations that involved the water supply, and you’re experiencing low water pressure afterwards, it would be best to consult with a plumber.
Symptom
Potential Problem
Solution
No water pressure at all
Possibly a major pipe breakage
Call a plumber immediately
Low pressure in multiple locations
Issues with the main water line
Schedule a professional inspection
Pressure drops after home renovations
Changes in plumbing may have impacted water flow
Consult with a plumber
Remember, attempting more complex remedies yourself can sometimes exacerbate the problem. More importantly, these issues can be underlying symptoms of much larger problems that might seriously impact your home’s plumbing system. It might be more cost-effective, in the long run, to hire a professional plumber to detect and fix the problem correctly and comprehensively.
To Conclude
In conclusion, low water pressure in your shower can be caused by a myriad of problems including clogged pipes, faulty fixtures, and issues with the municipal water supply. It’s critical to understand these potential causes because it can save you considerable time and money when attempting to diagnose and resolve the problem. However, a professional plumber will have the tools, knowledge, and experience to solve these issues both efficiently and effectively. After all, nothing beats a good, high-pressure shower to kick-start your morning or unwind after a long day. Remember, maintaining your plumbing system leads to a smoother, more relaxed and well-hydrated lifestyle. Always make sure the water pressure in your shower remains on the high side. Take steps as needed and never underestimate the role your plumbing system plays in your home’s functioning and your overall comfort. Knowledge is power, and we hope this article empowers you in maintaining your home’s plumbing system.
Welcome to our informative guide on “Understanding Low Kitchen Sink Water Pressure: Causes & Solutions”. This post is designed to educate you about the common causes of low water pressure in your kitchen sink, and provide you with expert-recommended solutions to fix this issue. It’s based on facts and filled with useful insights that can help you diagnose and resolve the problem, saving you time, frustration, and potentially unnecessary expenses. Whether you are a homeowner experiencing this problem or someone who simply wants to learn, this easy-to-understand guide is a handy resource. So, let’s dive in and get your water pressure back to normal.
Understanding the Concept of Water Pressure in Kitchen Sinks
Understanding the concept of water pressure is crucial to diagnosing problems in your kitchen sink. When you turn on the faucet and only a meager dribble of water comes out, it’s a clear indicant of low water pressure. This can be a real inconvenience, especially when you need to do dishes or prepare meals. There are several reasons for this issue, ranging from blockages in the pipes to simply having a faucet aerator filled with hard water deposits.
Pipe Blockages: Sometimes, water pressure can be affected by blockages or impediments within the pipes. These are often caused by an accumulation of debris such as food particles, grease, or mineral deposits. Over time, these may build up until they significantly reduce the flow of water. Cleaning or replacing the pipes may solve the problem.
ProblemPossible causeSolutionLow water pressureBlockages in pipesClean/replace pipesLow water pressureFaucet aerator filled with hard water depositsClean/replace aerator
Faucet Aerators: The small component that sits at the end of your faucet, known as an aerator, can sometimes be the culprit. Aerators are designed to add air to the water flow, but if they get clogged with mineral or hard water deposits, they can significantly restrict the water pressure. Removing, cleaning, or replacing the aerator can restore the water pressure to normal.
Exploring the Various Causes of Low Water Pressure in Kitchen Sinks
One of the common complaints in many kitchens is about dealing with a sink with low water pressure. In many cases, several factors may contribute to this troublesome occurrence, and understanding these underlying reasons can guide you towards an effective solution. So, let’s uncover the mysteries behind that weak kitchen sink stream.
Primarily, clogged aerators are a common culprit which can significantly reduce water pressure. The aerator, a small device at the end of your faucet, regulates the water flow and minimizes splashing. Over time, minerals in the water can build up and cause clogging. To fix this, you can simply unscrew the aerator, clean it, and screw it back on.
A leaky pipe can also reduce water pressure. This usually happens due to wear and tear or damage. In many cases, you might not even realize that there’s a leak until you notice a lower water pressure or a spike in your water bill.
A common cause for low water pressure not just in the kitchen, but throughout the house, is a fault in the pressure regulator. The pressure regulator helps control the amount of water pressure that’s distributed to your faucets. If it’s malfunctioning, it could lead to low pressure.
Lastly, low water pressure might arise from your home’s location. For homes located at the top of a hill, gravity might reduce the pressure of water reaching your kitchen sink.
Aside from the reasons outlined above, this issue could be indicative of a larger problem within your plumbing system. Therefore, if the simple fixes don’t work, it is recommended to seek the help of a professional plumber. Remember, it’s important not to ignore these issues - while they might seem trivial, they could potentially signal something more severe.
An In-depth Analysis of Plumbing System Issues and Water Supply Problems
Common plumbing system issues can impair the water supply leading to low pressure in your kitchen sink. One primary cause, which may not be readily apparent, is pipe corrosion. Old, galvanized iron pipes have a mandate for corrosion over time. The resultant rust not only discolors your water supply but can also reduce your water pressure significantly. Another cause can be leakages in your plumbing system. Even a tiny leak can lead to significant pressure loss, which tends to impact your kitchen sink the most as it is frequently in use.
Your low water pressure could also be a resultant of an inadequate water supply. Auxiliary water systems such as those linked to wells or tanks do not have the same pressure levels as mains supply, which could affect your kitchen sink water force. Also, sometimes blockages incidentally built up in pipes can restrict water flow. This could be caused by anything from hardened minerals to small objects:
Hardened minerals
Small foreign objects
Fortunately, understanding these causes helps in creating and implementing effective solutions.
In dealing with pipe corrosion, the best solution is to update your plumbing system with newer, more durable materials. Leakages can be sealed or, in severe cases, pipes replaced. Kitchens linked to auxiliary water systems could benefit from the installation of a water pressure booster pump. Blockages, on the other hand, can be cleared using various methods including using a plumber’s snake or opting for professional hydro-jetting services.
Causes and Solutions to Low Kitchen Sink Water Pressure
Remember, while DIY fixes may seem economical, some issues require professional expertise and should not be underestimated.
Practical Solutions to Improve Kitchen Sink Water Pressure
Identify Problem Areas
The first step towards amending your low water pressure issue is identifying the problem areas. Does your kitchen sink have low water pressure all the time or just sometimes? Is it only your kitchen sink that’s facing the problem or are other faucets in your home affected too? Making such observations help in focusing on the specific area of concern. Notably, there could be several plausible reasons behind the low water pressure in your kitchen sink. These include issues with your home’s plumbing system, a faulty pressure regulator, clogged aerators, or even an issue with the local water supply.
Common Causes of low water pressure in the kitchen sink
Problem
Solution
Clogged aerator
Clean or replace the aerator
Faulty pressure regulator
Adjust or replace the pressure regulator
Issue with home’s plumbing
Inspect and repair pipe leaks
Local water supply problem
Contact local water department
Effective Kitchen Sink Water Pressure Solutions
Once you have a clear understanding of what’s causing the low water pressure, you will need to implement the correct, tailored solutions. For example, if a clogged aerator is causing low water pressure, simply removing and cleaning it might do the trick. Alternatively, you might have to replace it in case of significant damage. In situations where the pressure regulator is the culprit, it would be best to seek help from a professional plumber to adjust or replace it properly.
Likewise, if your home’s plumbing is causing the issue, you’ll need to arrange a thorough inspection to find and repair any pipe leaks or obstructions. If the issue is beyond your control, such as a local water supply problem, reporting the concern to your local water department should be your course of action. Each of these practical solutions aims to restore the optimal water pressure to your kitchen sink and ensure a smoother, more efficient daily routine.
Expert Recommendations for Maintaining Optimal Water Pressure in Kitchen Sinks
Maintaining Optimal Kitchen Sink Water Pressure:
An optimal water pressure is crucial to ensure that your kitchen sink functions properly and effectively. Experts often recommend a pressure range of 45 to 55 psi for residential purposes. Below are a few steps you can take to maintain the ideal water pressure in your kitchen sink:
Regular Check-ups: Perform pressure tests regularly to monitor the level of water pressure. This can be done using a water pressure gauge.
Clean Faucets: Over time, sediment or other particles can build up in the faucet, reducing water flow. Regular cleaning can help keep the water flow smooth.
Correct Pipe Size: Make sure the pipes installed are of the correct size. Smaller pipes can restrict the flow of water and lead to lower water pressure.
If you encounter an issue related to low water pressure in your kitchen sink, it’s important to understand the possible causes. While some problems might be related to broader plumbing aspects of your house, others might be specific to the sink. By identifying and understanding these causes, you can work towards a more effective solution.
Possible Cause
Solution
Clogged pipes
Use a plumber’s snake or high pressure cleaner to unclog the pipes.
Leaky pipes
Inspect your pipes regularly. In case of any leaks, fix or replace them immediately.
Size of the pipes
If the size of the pipes is too small it can restrict water flow. Consider upgrading to a bigger size.
The Role of Regular Plumbing Maintenance in Preventing Low Water Pressure Issues
When it comes to maintaining a stable water pressure in your kitchen sink, regular plumbing maintenance plays a pivotal role. Over time, accumulation of sediment, mineral buildup, or the onset of leaks can cause a drop in water pressure. As part of your routine plumbing maintenance, these issues can be checked for, detected early, and rectified, preventing any sudden or drastic drops in water pressure.
Firstly, routine flushing of your water heater can eliminate sediment buildup, ensuring smooth water flow. Secondly, regular inspection of pipes and faucets can identify mineral deposits before they worsen, alleviating potential water pressure issues. Thirdly, early detection and repair of pipe leaks can save your system from losing valuable pressure. An experienced plumbing professional can guide you through the process, making preventative maintenance easy and efficient.
Solution
Description
Water Heater Flushing
Eliminates sediment buildup to ensure smooth water flow.
Pipe & Faucet Inspection
Discovers mineral deposits before they cause significant issues.
Taking the necessary steps to maintain your plumbing can not only help prevent low water pressure in your kitchen sink, but also extend the overall life of your plumbing system. By scheduling regular plumbing maintenance services, you guarantee a healthier, more efficient system – resulting in overall improved water pressure and fewer plumbing emergencies.
Being proactive rather than reactive in dealing with plumbing issues can also save you from costly repair bills. After all, it is far more cost-effective to maintain your system regularly than to pay for a huge repair due to negligence. So, consider the important role of regular plumbing maintenance in maintaining good water pressure.
In Summary
In wrapping up, understanding the causes behind low kitchen sink water pressure is the first key step towards finding a formidable solution. From blockages and leaks to outdated fixtures—the problems can range from simple to complex. The good news is, most can be self-diagnosed and often require just a basic understanding of your plumbing system to remedy. However, when in doubt, always remember that the services of a professional plumber are invaluable. They hold years of expertise and specialized knowledge, allowing them to quickly and efficiently resolve the issue. This article should serve as a valuable resource in your understanding and tackling of low kitchen water pressure. Remember, the ultimate goal is to ensure you have a functional and efficient kitchen at all times. Life, after all, gets much easier when the water flows freely. Enjoy your kitchen, and ensure every element, including your sink, is serving you correctly.
Hi my name is Angel Muro I established Comfort Time Heating & Cooling driven by my deep passion for HVAC and a sincere commitment to improving our customers' comfort. My initial fascination with plumbing, heating, and air conditioning systems has evolved into a dedicated profession, emphasizing the significance of both technical expertise and a warm, customer-centric approach. This blog aims to provide valuable insights and information. While some pages provide details about our services, my primary goal is to share real-life experiences that can assist you in various HVAC matters.
Have A Plumbing, Heating Or Air Conditioning Project & You Can Us Our Help?
Comfort Time Plumbing Heating & Cooling Servicing Southern California
At Comfort Time Plumbing Heating and Cooling, we are your trusted HVAC & Plumbing experts serving Southern California. With years of experience in the industry, we take pride in delivering top-notch heating and cooling solutions tailored to the unique climate and needs of the region. Whether you're in the coastal areas, inland valleys, or urban centers, our team of dedicated professionals is here to ensure your year-round comfort. We stay up-to-date with the latest technologies to offer energy-efficient solutions, and our commitment to customer satisfaction means you can rely on us for prompt and reliable service. When it comes to your HVAC needs in Southern California, Comfort Time is the name you can trust.